Transform your 4th generation Cummins diesel truck with a robust manual transmission swap, enhancing driving engagement and control for a truly personalized experience.
Overview of the Swap
The 4th Gen Cummins manual swap involves replacing the factory automatic transmission with a robust manual system, typically a G56 or NV5600. This conversion dramatically alters the driving experience, offering greater control and a more direct connection to the engine. It’s a complex undertaking, requiring significant mechanical skill and specialized components like a bellhousing, clutch kit, and potentially ECU tuning to ensure seamless integration and optimal performance.
Why Choose a Manual Swap?
Opting for a manual swap delivers a more engaging and connected driving experience, appealing to enthusiasts seeking greater control over their Cummins-powered truck. Manual transmissions often offer improved reliability and durability, alongside potential fuel efficiency gains. Furthermore, a manual swap can unlock increased horsepower handling capabilities, making it ideal for performance-oriented builds and demanding applications.

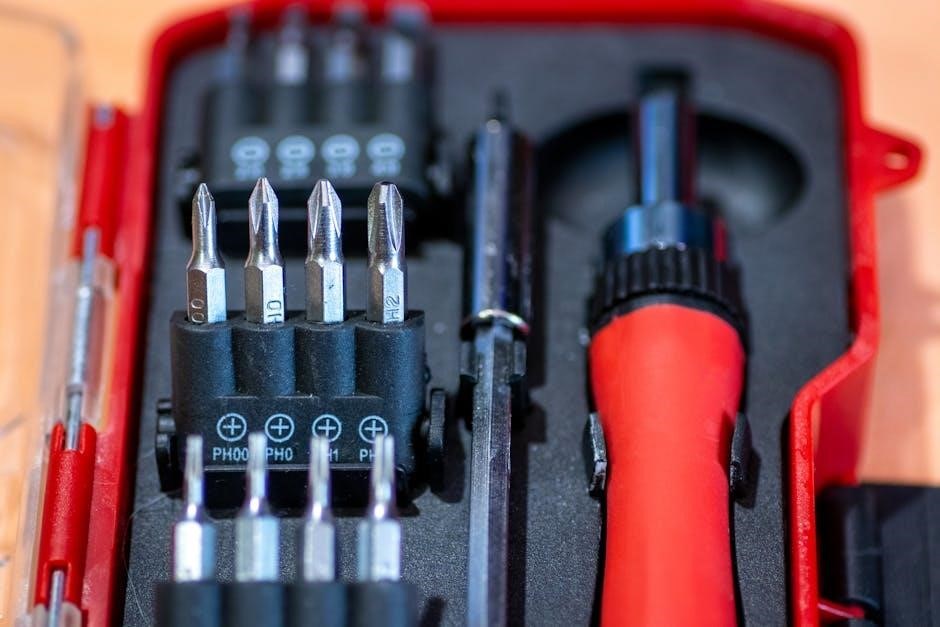
Understanding the Components of a Swap Kit
A comprehensive swap kit includes a transmission, bellhousing, clutch, flywheel, and necessary hardware for a seamless conversion of your 4th gen Cummins.
Transmission Options (G56, NV5600)
For 4th gen Cummins swaps, the G56 and NV5600 transmissions are popular choices; The G56, known for its strength, features a wider gear ratio spread, ideal for towing and off-roading. Conversely, the NV5600 offers a smoother, quieter operation, often favored for daily driving. Selecting the right transmission depends on your truck’s intended use and desired driving characteristics, impacting overall performance and enjoyment.
Bellhousing and Adapter Plates
A crucial component of any Cummins manual swap is the bellhousing and adapter plate. These parts securely mate the chosen transmission to the Cummins engine. Adapter plates ensure proper alignment, while the bellhousing provides a robust connection. Careful selection, based on transmission type, is vital for a successful, reliable installation, preventing vibrations and ensuring drivetrain integrity.
Clutch Kits and Flywheels
Selecting the correct clutch kit and flywheel is paramount for a successful 4th Gen Cummins manual swap. The flywheel must match the chosen transmission and crankshaft flange. Clutch kits should be rated for the engine’s torque output, offering smooth engagement and durability. Upgraded options enhance performance, while ensuring proper break-in is essential for longevity.
Preparation Before the Swap
Thoroughly assess vehicle compatibility, gather necessary tools, and potentially source a donor truck for crucial parts before initiating the 4th Gen Cummins manual swap.
Vehicle Assessment and Compatibility
Before embarking on a 4th Gen Cummins manual swap, meticulously verify your truck’s specific configuration. Confirm engine type, existing transmission, and driveline components. Ensure the chosen swap kit is explicitly compatible with your year, make, and model. Consider potential modifications needed for the driveshaft, crossmember, or pedal assembly. Thorough research prevents costly setbacks and guarantees a successful, seamless integration of the manual transmission system.
Tools and Equipment Required
A successful 4th Gen Cummins manual swap demands a comprehensive toolkit. Essential items include a full socket set, wrenches, torque wrench, hydraulic jack and stands, transmission jack, and various hand tools. Diagnostic tools, like a scan tool, are crucial. Welding equipment may be needed for bracket modifications. Safety gear – gloves, glasses – is paramount throughout the entire installation process for a secure outcome.
Sourcing a Donor Truck (for parts)
Locating a suitable donor truck is vital for a cost-effective 4th Gen Cummins manual swap. Prioritize a truck with the desired transmission (G56 or NV5600) in good working order. Inspect for mileage and overall condition. Salvage yards and online marketplaces are excellent resources, but thorough inspection before purchase is essential to ensure compatibility and avoid future complications.

Installation Process: Step-by-Step
Begin by safely removing the automatic transmission, then carefully install the manual transmission and bellhousing assembly, ensuring proper alignment for seamless operation.
Removing the Automatic Transmission
Disconnect the driveshaft, shift linkage, and all electrical connections from the automatic transmission. Support the engine from above to prevent tilting during removal. Carefully drain the transmission fluid before unbolting the transmission from the engine. Lower the transmission slowly, ensuring no damage occurs to wiring or lines. This process requires patience and attention to detail for a smooth swap.
Installing the Manual Transmission and Bellhousing
Align the manual transmission with the engine, carefully installing the bellhousing and ensuring proper fitment. Use a pilot bearing and alignment tool for smooth engagement with the crankshaft. Secure the bellhousing with appropriate bolts, tightening to the manufacturer’s specifications. Double-check alignment before proceeding to the next installation stage.
Connecting the Clutch System
Install the clutch disc and pressure plate, ensuring correct orientation and alignment with the flywheel. Connect the clutch fork to the throw-out bearing, verifying smooth operation. Properly route the clutch hydraulic lines or cable, bleeding the system to eliminate air. Confirm full clutch engagement and disengagement before proceeding.

Electrical and Wiring Considerations
Address the neutral safety switch and potential ECU tuning needs for proper operation after the manual transmission swap, ensuring seamless integration.
Neutral Safety Switch Modifications
The factory neutral safety switch prevents starting in gear with an automatic transmission; a manual swap requires bypassing or modifying this system. Solutions include utilizing a manual switch activated by the clutch pedal position, or reprogramming the ECU to eliminate the safety check entirely. Careful wiring and testing are crucial to ensure reliable starting and prevent unintended operation, maintaining vehicle safety standards post-conversion.
ECU Tuning and Programming
Post-swap, the Cummins ECU often needs reprogramming to remove automatic transmission-related codes and optimize performance for the manual configuration. Tuning can also adjust parameters like torque management and fuel delivery. Custom tuning is frequently required to ensure proper operation, eliminate error messages, and maximize the benefits of the manual transmission upgrade for enhanced drivability.

Post-Installation Checks and Adjustments
Thoroughly inspect fluid levels for leaks, and meticulously adjust the clutch pedal for optimal engagement and a smooth break-in period post-swap completion.
Fluid Levels and Leak Checks
After completing the manual swap, carefully verify the transmission fluid level, ensuring it meets the manufacturer’s specifications for optimal performance and longevity. Meticulously inspect all connections – including the bellhousing, transmission lines, and the rear main seal – for any signs of fluid leakage. Address any leaks immediately to prevent damage and maintain proper operation. Don’t forget to check the clutch master and slave cylinder fluid levels as well!
Clutch Adjustment and Break-In
Proper clutch adjustment is crucial for smooth engagement and preventing premature wear. Follow the manufacturer’s guidelines for pedal free play and travel. A gradual break-in period of approximately 500 miles is essential, avoiding harsh launches and heavy towing during this time. This allows the clutch disc to properly mate with the flywheel, maximizing its lifespan and performance.

Common Issues and Troubleshooting
Address potential shifter alignment problems or clutch pedal feel issues promptly; careful diagnosis and adjustment are key to a successful manual swap experience.
Shifter Alignment Problems
Incorrect shifter alignment can result in difficulty selecting gears or a vague, imprecise shifting feel. Carefully check the shifter baseplate installation, ensuring proper positioning relative to the transmission. Verify that the shift linkage is correctly adjusted and free from binding. Minor adjustments to the linkage or baseplate may resolve alignment issues, providing a smoother, more accurate shifting experience. Thoroughly test all gears after any adjustments.
Clutch Pedal Feel Issues
Problems with clutch pedal feel, such as a spongy or excessively firm pedal, often stem from hydraulic system issues. Bleed the hydraulic line thoroughly to remove any air bubbles. Inspect the master and slave cylinders for leaks or internal damage. Ensure proper adjustment of the clutch pedal linkage for optimal engagement and disengagement, leading to a comfortable driving experience.

Stainless Steel Tank Applications Relevant to Diesel Trucks
Diesel trucks benefit from stainless steel tanks for secure liquid fertilizer, water, or fuel storage, offering durability and corrosion resistance for agricultural needs.
Liquid Fertilizer Storage
Stainless steel tanks are ideally suited for liquid fertilizer storage due to their resistance to corrosive properties. KBK’s custom designs cater to diverse applications, including nurse tanks crucial for agricultural operations. These tanks ensure the safe and reliable containment of fertilizers, preventing contamination and maintaining product integrity, vital for optimal crop yields and efficient farming practices.
Water and Fuel Storage
Stainless steel tanks excel in water and fuel storage, offering durability and preventing contamination. AAtanks provides custom designs for various needs, including water cisterns and fuel containment. Their corrosion resistance ensures long-term reliability, safeguarding valuable resources and minimizing environmental risks, making them a superior choice for diverse storage applications.
Stainless Steel Tank Materials and Construction
Tanks are crafted from high-quality 304 or 316 stainless steel alloys, ensuring exceptional strength, corrosion resistance, and suitability for demanding agricultural and industrial uses.
304 vs 316 Stainless Steel
304 stainless steel offers excellent corrosion resistance and is ideal for general-purpose applications like water storage, providing a cost-effective solution. However, 316 stainless steel boasts superior resistance to chlorides and other harsh chemicals, making it preferable for storing corrosive liquids like liquid fertilizers. This enhanced durability justifies the higher cost when dealing with aggressive substances, ensuring a longer tank lifespan and preventing contamination.
Tank Styles (Flat-Bottom, Hopper-Bottom)
Flat-bottom tanks are a versatile and economical choice for general liquid storage, offering easy cleaning and straightforward installation. Hopper-bottom tanks, conversely, facilitate complete drainage via gravity, crucial for viscous fluids or when residue buildup is a concern. Selecting the appropriate style depends on the specific liquid and operational requirements, optimizing efficiency and minimizing waste.
Cost Analysis of the Swap and Tank Integration
Budgeting for a manual swap and stainless steel tank requires considering kit prices, professional labor, and potential modifications for a seamless, functional integration.
Swap Kit Costs
A comprehensive 4th Gen Cummins manual swap kit typically ranges from $3,000 to $6,000, depending on the transmission choice (G56 or NV5600) and included components. Essential elements like the bellhousing, adapter plate, clutch kit, flywheel, and shifter mechanism contribute significantly to the overall expense.
Tank Costs and Installation
Stainless steel tank costs vary widely based on size, material (304 or 316), and style—expect $1,500 to $8,000+. Installation adds $500 to $2,000+, depending on complexity and professional labor rates. Factors include site preparation, plumbing connections, and ensuring proper venting and safety features are implemented correctly.

Resources and Communities
Engage with online forums and dedicated groups for invaluable support, shared experiences, and expert advice throughout your 4th Gen Cummins manual swap journey.
Online Forums and Groups
Numerous online communities cater specifically to Cummins diesel enthusiasts undertaking manual swaps. These platforms offer a wealth of information, including detailed build threads, troubleshooting guides, and parts sourcing assistance. Active forums provide a space to ask questions, share progress, and connect with experienced individuals who have completed similar conversions. Dedicated Facebook groups also foster collaboration and real-time support, making the swap process significantly smoother and more enjoyable for all involved.
Professional Installation Services
For those lacking the expertise or time for a DIY approach, professional installation services are readily available. Specialized shops possess the necessary tools, experience, and knowledge to execute a flawless 4th Gen Cummins manual swap. These services typically include transmission installation, clutch setup, wiring modifications, and ECU tuning, ensuring optimal performance and reliability. While more costly, professional installation offers peace of mind and a guaranteed quality outcome.
Legal Considerations and Emissions
Ensure your manual swap complies with local regulations and emissions standards; modifications may require inspection and approval to remain street legal and avoid penalties.
Local Regulations and Inspections
Before undertaking a manual swap, thoroughly research your state and local vehicle modification laws. Many jurisdictions require inspections following significant alterations like transmission changes. These inspections verify compliance with safety and emissions standards. Be prepared to present documentation proving the swap was performed correctly and doesn’t compromise vehicle safety or environmental regulations. Failure to comply can result in fines or require reverting to the original configuration.
Emissions Compliance
Maintaining emissions compliance is crucial post-swap. Ensure your ECU tuning accommodates all emissions equipment, including the catalytic converter and EGR system (if applicable). Modifications affecting these systems are often illegal. Verify your local regulations regarding emissions testing and be prepared to demonstrate your vehicle meets required standards. Improper tuning or removal of emissions controls can lead to substantial penalties.

Future Upgrades and Modifications
Elevate your swapped Cummins with performance clutch upgrades and short-throw shifters, optimizing both power handling and driver feel for enhanced performance.
Performance Clutch Upgrades
After a 4th Gen Cummins manual swap, consider a performance clutch to handle increased horsepower and torque. Options range from heavy-duty single-disc clutches for moderate gains to multi-disc setups for extreme power. Upgrading the flywheel material to billet steel enhances durability. Ensure compatibility with your chosen transmission (G56 or NV5600) and consider pedal feel adjustments for optimal engagement and drivability, maximizing the swap’s potential.
Short Throw Shifters
Enhance the driving experience post-swap with a short throw shifter kit. These reduce shift lever travel, providing quicker, more precise gear changes. Several manufacturers offer kits specifically designed for the G56 or NV5600 transmissions commonly used in Cummins swaps. Installation is generally straightforward, improving driver control and responsiveness, ultimately making the manual conversion even more enjoyable and engaging on the road.